UPDATE: Apple has removed the Stationery feature from Apple Mail in macOS Mojave, so I have come up with an even easier way to create email templates in Apple Mail.
Do you ever find yourself writing the same general email over and over? I’ve found myself spending a lot of time responding to initial questions and project requests from potential clients. Usually it takes a few emails or phone calls to uncover the project’s details to a level where the client feels understood and our team feels comfortable with scope and timeline. But the first email is usually some variation of the same thing: who we are, why we are contacting you, and what we suggest as a next step. Your role might be totally different, but I suspect everyone has some message that they reuse.
If you use Apple’s Mail app here is how (text and video instructions below) you can save yourself time by creating reusable Apple Mail templates (aka Stationary).
Create Mail app templates in less than 2 minutes (video)
Four Easy Steps to Create Apple Mail Templates
- Create a new email message. Add the template that you often reuse as you’d like it to appear each time you load the template (just like a signature line). You can also add dummy text to delete later, if you wish.
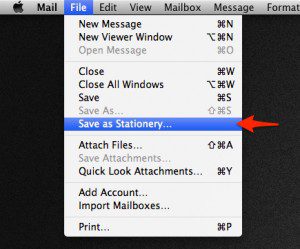
- When you’re satisfied with your work, choose Save as Stationery from Mail’s File menu. The program will prompt you to name your template.

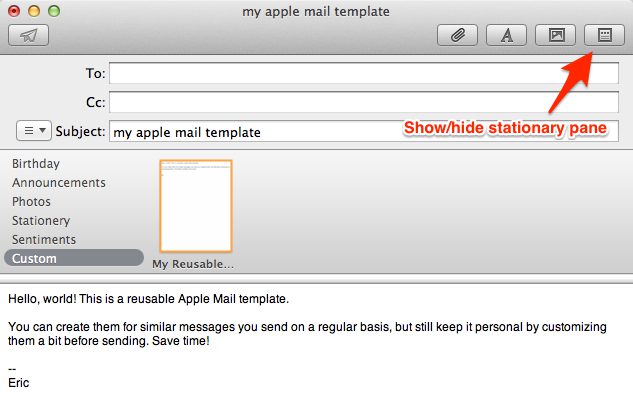
- When you want to load your template, create a new message and click the Show Stationery button. You’ll see the Apple templates, organized in folders. (You may need to scroll down to see all the folders.) At the bottom of the list is a new folder, Custom, where your template resides. Any additional templates you create will be stored in the Custom folder as well.
- Select the Custom folder, click on the icon for your custom template, and the template appears, ready for you to add new text. When you’re done writing your new message, send like any other email.

I hope this helps you! Do you have any other Apple Mail tips for templates? Please share in the comments below.

Leave a Reply